Hi everyone!
As I write this blog post, Halloween is approaching so I thought it would be fun to create a drawing tutorial on how to draw a pumpkin for beginner artists!
This will be a step-by-step guide at first, but at the end, I will also be including more pumpkin drawing ideas for you to try out on your own.
And as usual, here are some drawing tips!
I recommend first creating a sketch of what you want to draw in pencil. When you are satisfied with your sketch, go over the lines with an ink pen.
Once the ink dries, erase the pencil sketch with an eraser.
Now, you have yourself a beautiful final drawing to enjoy!
But feel free to draw however you like and use whatever medium you want!
And don’t worry too much about perfection!
We are all just practicing our art, no matter what stage we are at. Just focus on drawing and having a fun time!
Now – let’s get to our pumpkin drawing tutorial!
I hope you have fun~

Step 1: Draw the Outline
First, draw the outline of your pumpkin in pencil.
For this tutorial, I recommend doing all the drawing steps in pencil because we’ll be erasing some lines later.

Pumpkins come in various shapes, from round to short and flat, to more taller ones.
Draw whatever outline you would like your pumpkin to look like!
Step 2: Draw the Stem
For Step 2, draw the stem of your pumpkin.
It doesn’t have the be perfect – have fun with it!
I drew mine kind of curvy, but you can draw yours straight… or however you want it to look!

Step 3: Draw an Oval
Now, we’re going to start drawing the bumpy parts of our pumpkin!
For Step 3, draw an oval below the stem.
The oval should overlap the stem slightly as shown below.

Step 4: Draw Pumpkin Ribs
I had to look up what the ridges or lines in the pumpkin are called – Apparently, they’re called ribs!
For Step 4, let’s draw some ribs!
Draw some curved lines radiating from the oval we drew earlier.
These curved lines should extend a little bit into the bottom of the stem – as shown below.

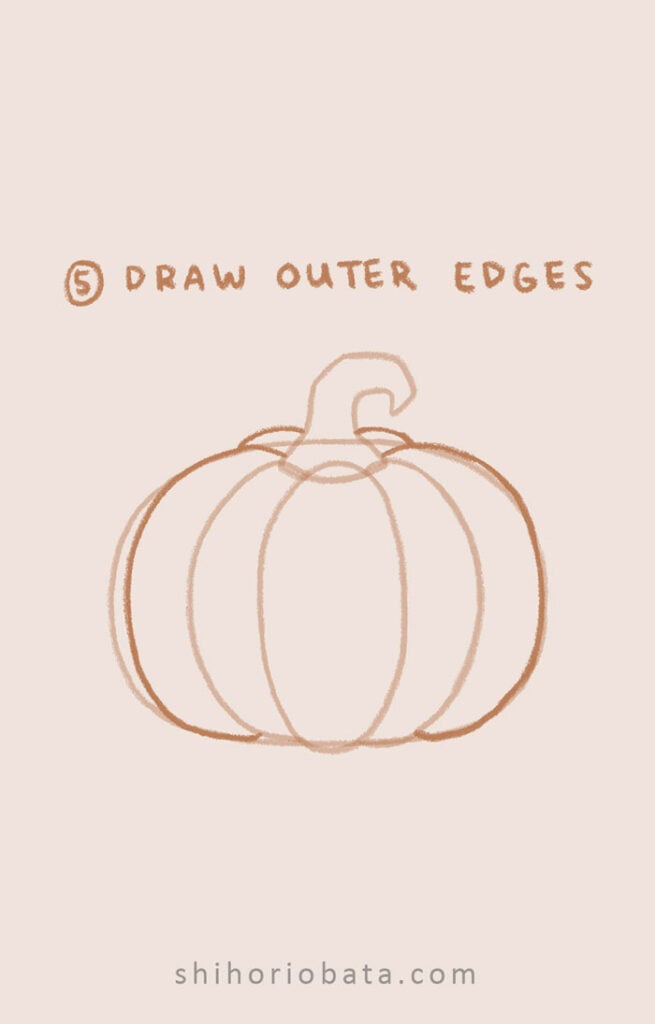
Step 5: Draw the Outer Edges
Now, we’re going to draw the outer edges of our pumpkin.
They should follow the outline we drew in Step 1.
Mine didn’t end up perfectly in line with the initial outline – and that’s okay. Draw whatever lines feel right to you!
You will also need to draw two little bumps behind, near the stem.

Do you see the pumpkin coming together?
Step 6: Erase Some Lines
Now, we’re going to erase the lines we no longer need.
Erase some or even all of the lines you drew in Step 1 (the outline of the pumpkin). Whatever lines you no longer need.
Also erase the base of the stem.
The parts I erased are shown using dashed lines in the depiction below.
** You can also instead of erasing the lines at first, go over your final lines with an ink pen. After the ink dries, erase the entire pencil sketch underneath to reveal your finished ink drawing. This is optional of course.

Step 7: Color It In!
Now’s the fun part! Let’s color our pumpkin!
Feel free to use whatever medium you like to color in your pumpkin – Crayons, markers, paint, ink, etc!

And we are done!
I hope you love your little pumpkin doodle!
Feel free to continue down this blog post to draw more pumpkins!
Thank you so much for giving this tutorial a try!
More Pumpkin Drawing Ideas!
Here is a cute pumpkin with a little face on it!
I love the little detail of the curly vine poking out at the top.

Here is a more scarier pumpkin drawing idea – perfect for the Halloween spirit.

Some more pumpkin doodles in various shapes 🙂

Here’s is a little pumpkin wearing a witch hat.

Just another cute drawing of pumpkins 🙂

Related Blog Posts:
23 Easy Halloween Drawing Ideas
50 Cute Easy Things to Draw
45 Small Quick Doodles to Draw
Thank you so much for stumbling across this blog post and giving this drawing tutorial a try!
I hope it was helpful and fun for you!
Let me know in the comment section down below how your pumpkin turned out (It takes a while for the comment to show up because I have to manually approve each comment)
Also – let me know if you have any suggestions as to what I should draw next! I love hearing suggestions from you all.
I am wishing you all a wonderful day or night – and until next time!
Take care~

Hi!!! I just want to say that I love your art so much and it really helps me feel better just scrolling through random drawing blogs. All of your drawings are so awesome and I love them all S000000(0 times ∞) much! Thank you for being awesome!
P.S What brand of inking pens do you use? It makes your drawings stand out and I love it!!!!!!!!!!!!!!
Your fan since 2022
Lil
Hi Lil! Thank you so much for your sweet comment and for being a fan <3
The pens I use are the Sakura Micron Pens!