If you are an artist, here are some of my best tips on how to promote your art on Pinterest.
Pinterest is one of the best things you can be doing when starting your own business of any kind.
As an artist, I absolutely love Pinterest because it is a hub for new ideas and inspiration, but it also helps me get my content and art out there to a wider audience than what I could do alone.

Why Promoting on Pinterest is so Important
- Pinterest is a visual search engine: Pinterest is another way besides Google for your content to be exposed to potential readers and shoppers.
- According to Omnicoreagency.com: 87% of Pinners have purchased a product because of Pinterest
- 72% of Pinners use Pinterest to decide what to buy offline.
- Its virality component: You can pin something to Pinterest, and even if you’ve forgotten about, months later it can suddenly go viral. All it takes is timing and the right pinner to come along.
When it comes to promoting on Pinterest, you don’t need a big following to go viral at all.
I have started a new account before on Pinterest with less than 5 followers and still had pins take off (50+ repins per day). That account had only been started 1-2 weeks prior.
For any new artist, Pinterest is an amazing tool to speed up growth of your art business by attracting new art followers and even sales.
1. Set Up Your Pinterest Profile for Success!
If you want to truly grow your Pinterest Account for your art business, you will need to set up a professional-looking profile.
- Use a professional photo of yourself or your logo
- Use keywords in your Profile Name and Description so people can find your profile when they search using relevant terms
- Add a link to your Website or shop
- Brand your pins and boards appropriately
- Pin a lot of content so that viewers know you are active
When someone stumbles upon your Pinterest profile, they are more likely to follow you if your profile is professional and well-branded.
Your visitors should know what you do and what you are passionate for in your life and artist career, as it helps them have a better understanding of who you are as an artist, and not just as another name on a computer screen.
2. Apply For Rich Pins
This applies for the most-part if you have a website or blog. Otherwise, you can disregard.
What are Rich Pins? Rich pins contain more information than just regular pins.
They contain important metadata pertaining to the pin that cannot be changed, unlike with Pin comment descriptions.
Despite a pin being repinned multiple times, all the vital information pertaining to what that pin is about will stay constant and true.
Plus, your chances at getting clickthroughs increases drastically when you set up Rich Pins.
There are 4 types of Rich Pins: App, article, product, and recipe Pins.
The one I use most is the Article Rich Pin for my blog posts.
To apply for rich pins, you will need to: Add site metadata, Validate, and Apply for Rich Pins.
For WordPress users, I recommend to simply use Yoast SEO plugin to enable metadata on your posts.
To Validate and Apply for Rich Pins, simply go to the Rich Pin Validator, enter the URL of any page on your website that you have added metadata to, then click Apply.
3. Create a Pinterest Board Exclusively for Your Content
This is important! Creating a board exclusively for your own content will:
- Help Pinterest users who view your profile understand what kind of content you are creating – That way, they are more likely to follow you if their interests align.
- Organize your content for easy repinning.
- Help Pinterest understand that these pins are related to each other, when recommending related pins to users.
You can also reorder the position of your Pinterest boards – So make sure that your own content is the first thing people see when they go to your Pinterest Board page. I also have my own board as the cover for my Pinterest Profile.
Next, start adding Pins from your Website, Shop, and Social Media to your board. My favorite way for adding pins quickly is by using Pinterest’s Browser button – You can get it here.
No matter where your image is located, you should be able to create a pin from the image using the Pinterest Browser button.
*Tip: When creating pins, make sure your Pin Description is filled with keywords. There are many ways of doing keyword research on Pinterest, but the easiest way is using the search bar on Pinterest. Search a term and you will see a list of other keywords related to this search at the top. Use these keywords to create your Pin Description.

Now that you have all of your own pins in one central location, it will make it a lot easier to pin to different boards (especially Group Boards). I will go over the importance of Group Boards later in this post, so stay tuned!

4. Create Boards Related to Your Niche / Brand
Create Pinterest boards that both you and your audience enjoy.
For example, I have several boards related to art: Art, Art Business, Abstract Art, Illustrations, Web Design, Ceramics, etc.
I constantly pin new content to these boards because these are interests that I love – And when new Pinterest users stumble onto my profile, they get an immediate idea of what I am passionate for.
Also, when pinning to your boards, it’s important to not just pin your own content: I have heard of Pinterest accounts being blocked if they are solely pinning their own content. Don’t make this mistake when first starting out!
5. Be Active!
As for your own content: Repin! Repin! Repin!
It isn’t enough to pin your own content just once.
You need to be continuously re-pinning your own pins to different boards: Both group boards and your own boards.
Be active and also pin the content of other’s. It’s important to support each other and learn from each other. Pinterest works the best when you are contributing and being active in its community.
Generally, I pin at least 40 pins/day. (2020 Update: I currently pin around 20 pins/day as best current practice)
Keep reading to learn about the exact tool I use to make this happen, but truly this is what helped my Pinterest growth really take off. Before, pinning at least 10 pins/day didn’t do much. If you are looking to grow your account quickly, you need to be active and engage on Pinterest.
6. Join Pinterest Group Boards
Joining Pinterest Group Boards have played such a huge role in helping to grow my Pinterest account.
Many of my repins come from Group Boards – So make sure to start joining Group Boards.
What are Pinterest Group Boards?
Group boards are Pinterest boards that allow multiple collaborators to pin to that certain board. Group boards are constantly being pinned to, and thus create a dynamic community, where content is constantly being circulated and shared.
It may be difficult to join Group Boards when you are first starting off Pinterest – So make sure you are active and have quite a few boards and content on your Profile.
It’s normal to not get an invite when first starting out. Sometimes it can even take a month or more to hear back from them.
So be patient – and just keep applying. You will find boards who will accept you as a contributor. Try requesting for an invite from 3-5 different group boards each day: The key is to just keep trying.
HOW DO YOU FIND GROUP BOARDS TO JOIN?
- Pinterest Search:
- In Pinterest’s Search bar, type in “your keyword” + “Group Board” (ie: Art Group Board)
- You will see pins that come up in your search results
- Go back up to the Search Bar and next to it, it’ll say “All Pins” in the Dropdown Menu. Select “Boards” instead of “All Pins”
- You should now see a list of Boards in your search results
- Click on the Group Boards you would like to join. Usually they’ll have instructions on how to join their Group Board in the Board Description
- PinGroupie:
- Search for Top Group Boards on PinGroupie based on category. It’s a free site… and they are so simple and extremely helpful just for finding the most popular Group Boards on Pinterest in your specific niche!
- If you’d like, you can join some of my art-related Group Boards: Here are the links to them – Just follow and message me on Pinterest to join
7. Use a Pin Scheduler
It takes A LOT of work and lots of luck to grow in a short period of time – However, there are smart ways of doing it and achieving that result.
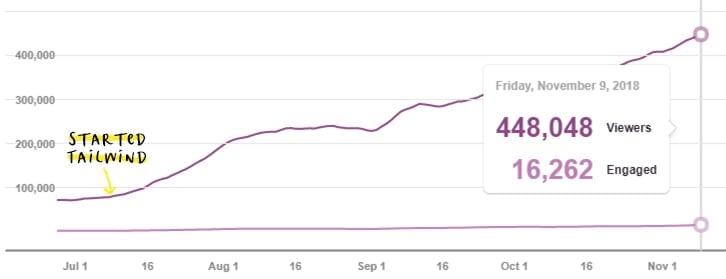
Tailwind is my secret weapon for growing my Pinterest account exponentially. If you are serious about growing your Pinterest account, I highly recommend trying out Tailwind (Use this link here for a FREE trial).
If you are interested on how to use Tailwind to grow your Pinterest account, read my blog post here for my step-by-step guide.
Tailwind can be confusing at first, but if you follow each of these steps one-by-one, it’ll make it a lot simpler. Plus, these were the exact steps I took to get to where I am now on Pinterest.
Update: I now have over 80K followers and over 10 million monthly views on Pinterest because of Tailwind. (Plus you can try it for FREE)


There are many things you can do to promote your art on Pinterest. I have listed many of these options, but you certainly don’t have to do all of them.
In fact, just pinning one of your pins to Pinterest and waiting several months can be enough for it to start taking off.
Pinterest is a great way of giving yourself and your art the potential to grow and succeed – so I highly recommend at least giving it a try!
I hope you learned something new from this blog post! If you enjoyed, consider liking, commenting, or sharing this post with others.
Thank you for reading as always, and I hope you have a wonderful day! Until next time lovelies! xx
very helpful information.thanks for the great content.
Thank you Maria for being a wonderful reader <3
Hello Shihori! Just found out about yours website and love it! Thank you for sharing those tips! I think i will be staying for good! hehe <3
Thank you – And I’m so happy these tips were able to help you <3 Lots of love x
Pinterest is a great source to drive traffic to the blog. It’s a very well describe blog post, Shihori!
Thanks for this post. I’m so confused because I followed a lot of these steps and I have zero views and zero repins after over a year of pinning and using Tailwind. I also can’t repin my own pins. It just says “promote” when I hover over it instead of “Save”. Is there a way I can fix this? Thank you!
Do you have the Tailwind browser extension? I believe the saving feature with Tailwind should come with the browser extension. I hope this helps to grow your Pinterest soon!
You give a lot of helpful information.
Thank you.
Glad to hear you found it helpful! ^^
Great stuff. Very insightful and inspiring. Thanks for sharing.
I’m so happy to hear that! Wishing you a wonderful day <3
Hi hihori!
Thak you for the info you shared! I don’t know how to message you on Pinterest 🙁 I wan’t to be in your groups
This is me: https://br.pinterest.com/artsy_juli/