Painting clouds doesn’t have to be so difficult!
I paint clouds a lot in the art I post on my blog so I decided to create a blog post dedicated on how to paint clouds for beginner artists.
Clouds come in all sorts of shapes, types, and colors.
They may seem complex and difficult to paint at first, but once you get the basics of painting clouds down, they are so much fun to paint!
In this blog post, we’ll be covering:
- Materials you need to paint your clouds
- A basic step-by-step guide to painting a cloud
- Different cloud painting ideas to try
- What exact acrylic paint colors I used to create the paintings
I hope all of these pointers help you to create your beautiful cloud painting!
Now let’s get started!

Materials Used
Acrylic Paint: I have made sure to include the exact paint colors I used in each step, but feel free to use whatever paint color you have as well!
Paper: Grumbacher Watercolor Paper. I also like to use the Canson Watercolor paper as well.
Paint Brushes: I like to use a detail brush for painting clouds (a paint brush that comes to a point rather than having a round or flat end). This helps to give your clouds a more wispy look. Feel free to use whatever paint brush you like though, you can make clouds with practically any brush!
Jar of Water: To wash off paint brushes
Paper towel or rag: To dab excess water from paint brushes
How to Paint Clouds Step-by-Step
Step 1: Paint the Background
When creating a cloud painting, you can paint the sky so many different ways.
You can use a solid color, a gradient, or a combination of several different colors.
For this tutorial, I will be simply painting the sky blue, but feel free to explore all sorts of sky colors in your own paintings!

For the color of the sky, I used Golden’s Light Phthalo Blue.
You can create your own light blue color by mixing blue and white together.
Step 2: Paint the Overall Shape of Your Cloud
Use Titanium White to paint the overall shape of your clouds.
I like to start by creating the shape of the top of my cloud and working my way down.
Make sure not put too much paint down.
It is perfectly okay that the white is not opaque on the first layer.
We will gradually be adding more layers to create that puffy-look to our clouds.
What we are trying to do in this step is to create the basic shape of our cloud.
Feel free to make your cloud shape whatever shape you like!
You can look outside at the sky for inspiration. You can also just make it a shape similar to the one down below.

Step 3: Add the Shadow Color
The bottom of clouds are darker than the top of the cloud.
So for our second layer to our clouds, we will be adding a darker shade to our cloud painting.
There are various colors of paints you can choose from for your darker shade, but I tend to choose purple or blue. Gray also works.
Using the same detail brush I used earlier, I create the puffy bottoms to the clouds by painting on my shadow color mixed with a bit of white.

For my shadow color in this tutorial, I chose to use Winsor & Newton’s Powder Blue. It’s a sort of dusty blue color that reminds me of a perwinkle blue.

Feel free to experiment with many different colors though! It doesn’t even have to be a blue-based color!
You will see farther down in the blog post that I created clouds with yellows and magentas as the shadow color too.
Use whatever color makes your heart happy 🙂
Step 4: Add Highlight
Sunlight hits the top part of clouds the most so we will be adding more white to the tops of our clouds.
Get some more Titanium White and keep adding more layers to the tops of your clouds until they are opaque.

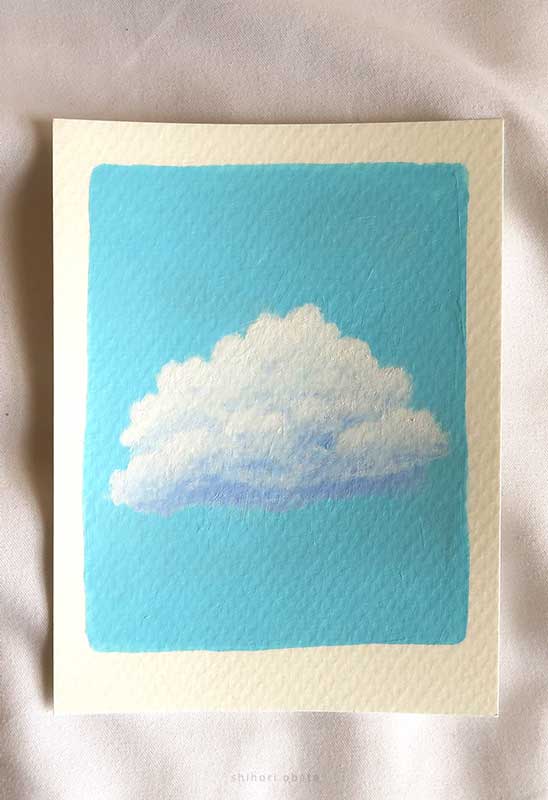
Step 5: Add Finishing Touches
Our cloud painting is almost done at this point.
The last step of our cloud painting is to keep refining the painting until you feel happy about how your cloud looks.
Keep adding more white to certain puffs and adding more of your shadow color wherever you think it needs more dimension.
Make sure to add some white and shadows to create a “puffy” look in the middle of the cloud as well (as clouds are three-dimensional).
Step 6: Keep Practicing!
Like everything with art, the key to refining your painting or drawing skill is to keep practicing!
You can look out your window and paint the clouds you observe at different times of the day or paint the clouds in the photos you take.
I have also added some more cloud painting ideas to try to help you get more practice as well!
Types of Clouds to Paint
Since there are so many types of clouds, here are a few examples of different types of clouds to paint.

For the background sky color in this painting, I used Winsor & Newton’s Winsor Blue mixed with Titanium White.
Cloud Painting Ideas
Below are some more cloud painting ideas to try out.
I have also included what exact paint colors I used, but feel free to use whatever colors you have on-hand as well.

Background: Liquitex’s Turquoise Deep and Titanium White
Clouds: Matisse’s Permanent Light Violet and Titanium White

Background: Matisse’s Permanent Light Violet and Winsor & Newton’s Permanent Magenta
Stars: Titanium White (Flick brush bristles where you want to create stars)
Clouds: Golden’s Light Magenta and Titanium White
I also used a Gelly Roll white pen (Can be found at your local art store or on Amazon here) to create some stars and the moon.

Background: Winsor & Newton’s Winsor Blue, Liquitex’s Turquoise Deep, and Titanium White
Clouds: Titanium White

Background: Golden’s Light Magenta
Clouds: Golden’s Naples Yellow Hue & Titanium White
Airplane & contrail drawn with a white Gelly Roll pen.

Background: Matisse’s Permanent Light Violet
Clouds: Holbein’s Brilliant Pink & Titanium White
Stars: Get some Titanium White on a brush and flick the bristles.
I also used a white Gelly Roll pen to create some stars and the moon.
Related Blog Posts:
30 Easy Acrylic Painting Ideas
40 Easy Things to Paint
31 Easy Watercolor Art Ideas
22 Easy Cloud Drawing Ideas

Thank you for stopping by this blog post!
Painting clouds is a lot of fun and once you get the hang of it, painting them can be just as peaceful of an experience as staring up at them.
Furthermore, even when the sky is completely overcast, now you can create your own colorful clouds in the comfort of your own room.
I wish you a wonderful day or night my fellow artists, and until next time!
Hi,thank you for this, im over here on the edge of tears because my clouds dont look right. found your blog, super helpful.you are a good artist.
I’m so glad this blog post could be of help to you! <3
Thank You, you saved my life, I was about to paint a cloudy sunrise without looking at this! Thanks again, you’re the best!
I’m so happy this blog post could be of help to you <3 Have a wonderful day!
Your blog has helped inspire me and give me confidence in tackling some ceiling clouds I’m dreaming about doing. I was getting overwhelmed with the idea, but this has grounded me, given me a visual process, and it helps even more that your practice piece fits the look I’m hoping to go for.
Thank you so much! This was really appreciated.
Awww that sounds like a beautiful idea! I’m sure you’re going to do great and I am wishing you a wonderful time creating your dreamy ceiling!